Do not be discouraged by the comments of others about your work. It seems some folks have no "eye" for abstract forms in weaving. When someone asks "...is that SUPPOSED to BE something?" I always say "No". If they can't see that there is something there, then explaining it won't accomplish anything. Some find it "delightful", while others view it as "visual noise". I don't feel responsible for others lack of imagination or taste in weave structures... to each his own.
Please notice that the hand spun yarn I have used in the photos is very heavy and the colours are quite odd, even for me. I was hoping that their use would make it more obvious how the weaving is done. The thing about Soumak weaving that is interesting is, that you can use any size loom (frame) and any size yarn. You can work quite small, using a needle and thread, or quite large using a six foot-wide advancing warp tapestry loom with strips of fabric or roving. The scale of the project is up to you. In some of the photos you will see that I've highlighted the warp with a red line so as to make the instruction more clear.
|
|
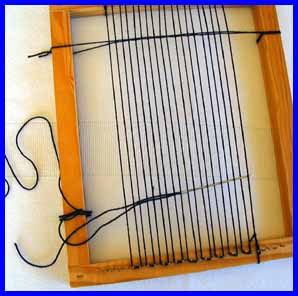
What you will need to get started:
|
After tying a secure knot (I like to use a square knot) and streching the warp tightly over all of the nail heads and then tying off at the opposite end, use a tapestry needle (or your fingers) and weave two rows of crochet thread at the bottom and top of the frame. Space them about 2 inches from the top and the bottom of the wooden frame. You will need these two inches later for tying off the woven edges. (In this example I have used every other nail for the warp, because the weft yarn is so thick.)
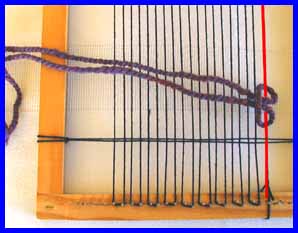
You can use the yarn as is, or you can cut a piece of yarn and split the plies. If you use the yarn as is, you will end up with 4 plies, if you split it, the weft will be two plies thick. You will be cutting the yarn into lengths of about 18" to 30". Fold the piece of yarn in half so as to make the loop you will use to attach to the warp yarn. If you have split the yarn, fold it in half and allow it to twist back into two plies again. Use a slip knot to attach the yarn to the warp. |
|
|
Pull the knot snug onto the warp. You will advance in the direction the yarn ends are pointing...to the left. When weaving from right to the left, you will hold the yarn "butterfly" (or folded yarn) in your left hand. When weaving from left to the right, you will hold the yarn with your right hand. |
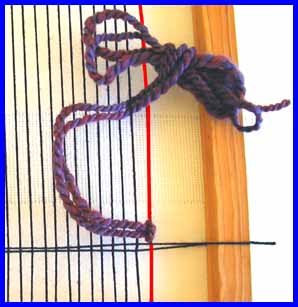
Hold the yarn with your left hand and pass the yarn under the warp thread. Take the yarn with your right hand and pass the yarn back through the loop you have just made. Pull tight with your left hand. Ta-Da! You have tied your first Soumak knot! This is all there is to it!With some practice it will become clearer just how tight to pull the knots. You will NOT want to pull them so tight that at the end of a row, the edge warp threads are pulled in and the edge becomes less than straight. |
|
|
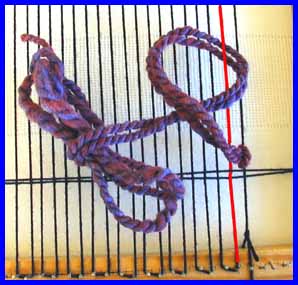
Work across the row tying a knot onto each warp thread. The whole concept of making shapes in the tapestry is rather simple. If one wanted to make a triangle one would decide the size by the number of knots to go across. Work a row across, then turn to work back across in the opposite direction. At every turn, the row would be started one warp thread over so that a one-knot-decrease per row is achieved. This would bring the weaving to a point...you will have made a triangle.If you wanted to make a square shape, you would decide the size of the square and make even rows turning back and forth. If one does this, the weaving that is done next to this shape will leave a gap or "split". More about this a little later. |
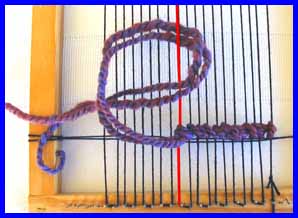
This shows making a turn. Tie a knot on top of the last knot and change hands to the right hand. Work across the row to the right edge. |
|
|
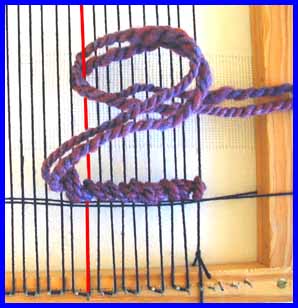
Use your plastic comb or metal dinner fork to tap the row of knots so that the rows are even. Tie a knot on top of the last knot and turn back to the left. |
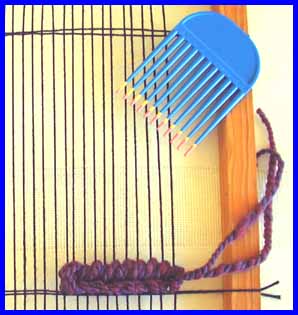
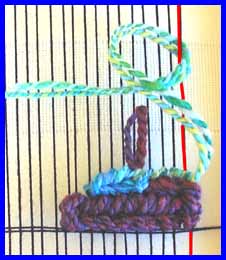
You can see that if I kept working as I have been, that soon enough I would have a square shape. What this photo does show is how to change colours, or if you simply ran out of yarn, but want to add on more yarn and continue on.Simply tie on the new yarn with a slip knot just as you did at the beginning. Be sure to include the tail of the yarn just ended. You will continue "tying in" or covering this tail for at least 3 or 4 rows, every time you come to it at this warp thread. |

|
|
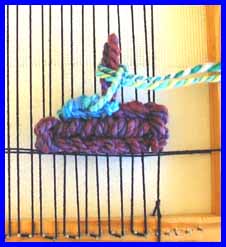
I have worked a few knots to the left and then turned back to the right....tied a knot to include that leftover tail and proceeded to the right edge. The red thread shows the turn back to the left. |
|
[an error occurred while processing this directive]